Microsoft Dynamics CRM is a great application for managing
customer, sales, and marketing data but it is not a very good document
management system. Fortunately Microsoft
has another product named SharePoint that is a great document management and
storage system and now with the new version of CRM you can link entities to
SharePoint so you can store related documents in SharePoint and utilize the
great document management features provided by that software platform. In this blog posting I am going to give an overview
of the integration possibilities between Microsoft Dynamics CRM and Microsoft
SharePoint.
First off let us take a brief look at the Document
Management section of the Microsoft Dynamics CRM Settings to see what is
available to us.
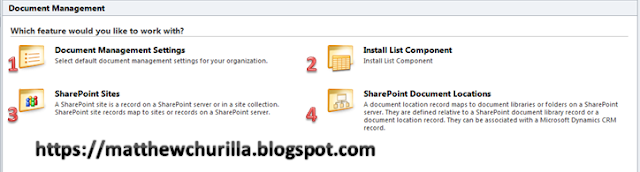
Document Management Settings – This option
allows you to do the base configuration for Document Management. This is where you go to configure which
entities in the system document management is enabled for and where you can
specify the primary document management location if you choose to have
one.
- Install List Component – This option points you
to instructions for downloading and installing the SharePoint list component
that you can install as a sandboxed solution for sites that you wish to enable
enhanced document management on.
-
SharePoint Sites – This section lists all of the
sites that are linked to CRM but unfortunately it is only useful for sites that
have the SharePoint List Component installed on them. If you are not using the list component adding
sites to this section will not have any effect in other parts of the system.
-
SharePoint Document Locations – This choice is a
great place for administrators to reference.
Listed in this section you will find every location that is linked to
from CRM.
Starting at the top let’s examine the document management
settings section.
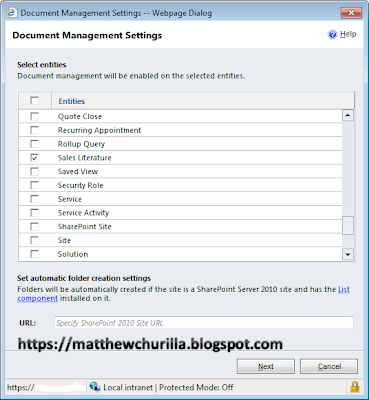
The primary listing
on this page allows you specify which entities you would like to enable
document management on.
A number of
these are enabled by default however you can enable document management for any
stock or custom entity that exists in the system.
There is a second option present on this
screen and that is an option that lets you specify a SharePoint 2010 site URL
to enable automatic folder creation; this provides you the capability to automate
your document management with a SharePoint 2010 site that has the List
Component installed on it.
We will
re-visit this later when we review the 2010 only features.
Next we are going to take a quick look at how things look
once you have document management enabled so you have a good feel for how
linked document libraries will behave.
So without further ado...
Here is a sample view of how a site will look when linked
via an absolute URL. Notice how this is
just an embedded view of the SharePoint Document Library, because of this, you
are capable of doing anything in this embedded view you could do normally in
SharePoint. The downside is it makes for
a busy screen because there is a lot going on visually and the two different UI
styles clash a little bit.
And here is a sample screenshot of how linked document
libraries look for sites that have the SharePoint List Component installed on
them, notice how the document library has a more integrated look and feel
to it this exposes all of the document management capabilities of SharePoint to the user
through a more seamless CRM user interface.
The last thing I want to point out is that you are able to
link more than one document location to each entity. You are capable of having many locations
which will allows you to separate documents into different
locations based on similar properties.
Next let’s move on to linking CRM entities to SharePoint
document libraries. For those of you
with SharePoint 2007 this will be the only integration option available to
you. However this functionality is not
only available to just 2007 users; if you are operating in an environment where
you cannot install the SharePoint 2010 List Component you can still use Document
Locations to connect SharePoint 2010 and CRM.
Document Locations are rather primitive because they just embed an HTML
viewer in the CRM page that simulates browsing the linked document library in a
web browser.
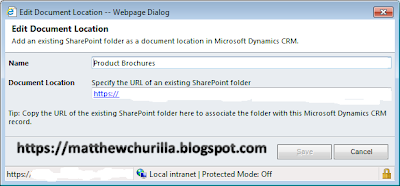
When you add a Document Location and don’t have any Site
Locations defined that have the SharePoint 2010 List Component installed you
will be presented with an “Add Document Location” dialog box that will only be
capable of linked via an absolute URL to a target document location. In order to do these just give your document
location a name and enter the full SharePoint URL you wish to link as a
document location.
Now let’s look at the SharePoint 2010 List Component; this
item allows you to directly link document libraries from SharePoint 2010 into
CRM. I will not go over installing this
component on a SharePoint site because this process is well documented
elsewhere (http://www.microsoft.com/download/en/details.aspx?id=5283). Once you have installed the list component on
a site you will have a few new capabilities available to you.
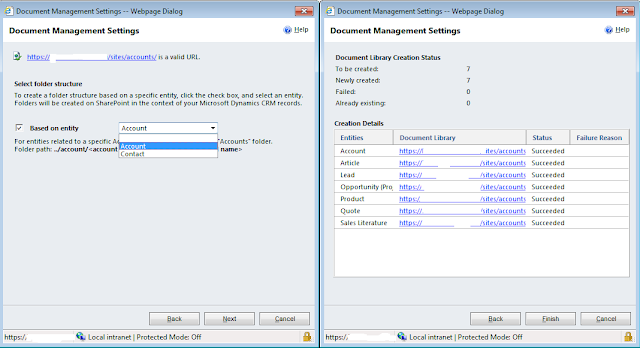
 First you will now be able to set an automatic folder creation
site. When you enable this feature you
will be prompted on whether you want to structure your folders by accounts or
contacts. Whenever you enable this feature entities
that are related to the based on entity will have all of their documentation
consolidated in the same folder structure within SharePoint. For
example if you had an account named Account 1 that had an opportunity named
Opportunity 1 then you would end up with a folder structure that was something
like “Account 1\opportunity\Opportunity 1” similarly if there was a quote named
Quote 1 the folder would be named “Account 1\quote\Quote 1”. If you don’t select to group items based on
entity it will group everything within a new document library named after the
entities that are contained within it.
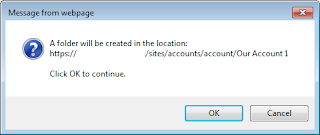
Once you have enabled automatic folder creation the first time someone
visits the document section of an entity they will be prompted to create a new
folder in the appropriate location. Personally I don't like to enable automatic document library creation, I feel that this removes some of the flexability of the system but this could be very convient for some organizations. Below are some screen shots of how this appears in the CRM interface.
First you will now be able to set an automatic folder creation
site. When you enable this feature you
will be prompted on whether you want to structure your folders by accounts or
contacts. Whenever you enable this feature entities
that are related to the based on entity will have all of their documentation
consolidated in the same folder structure within SharePoint. For
example if you had an account named Account 1 that had an opportunity named
Opportunity 1 then you would end up with a folder structure that was something
like “Account 1\opportunity\Opportunity 1” similarly if there was a quote named
Quote 1 the folder would be named “Account 1\quote\Quote 1”. If you don’t select to group items based on
entity it will group everything within a new document library named after the
entities that are contained within it.
Once you have enabled automatic folder creation the first time someone
visits the document section of an entity they will be prompted to create a new
folder in the appropriate location. Personally I don't like to enable automatic document library creation, I feel that this removes some of the flexability of the system but this could be very convient for some organizations. Below are some screen shots of how this appears in the CRM interface.
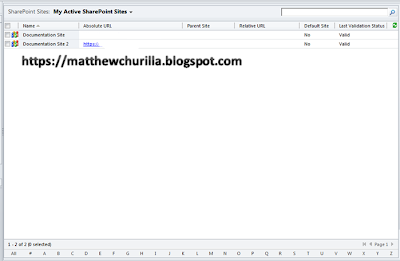 The second thing you will now be able to do is add sites
into the SharePoint sites list. Adding
sites here is a good way to allow users to create folders. When you have sites listed in the SharePoint
Sites list users will now have a second option when adding a new document
location. This option allows the user
creating a new document location to specifiy a new folder under an existing
site that you have added to the SharePoint Sites List.
The second thing you will now be able to do is add sites
into the SharePoint sites list. Adding
sites here is a good way to allow users to create folders. When you have sites listed in the SharePoint
Sites list users will now have a second option when adding a new document
location. This option allows the user
creating a new document location to specifiy a new folder under an existing
site that you have added to the SharePoint Sites List.
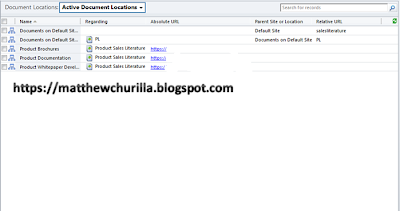
The last section we need to visit is Document Locations and
it is a very good section. The Document
Locations option enables you to view every link between CRM and SharePoint so
it is a great place to review for duplicate connections and to ensure that the
integration is being used properly. You
will notice in this final screen shot the difference between how absolute URL
links are displayed compared to Document Locations that are setup based on a
base SharePoint Site and relative references from there.
And that completes this posting on Document Management for Microsoft Dynamics CRM. I hope you are a little more informed now.